Posts

Showing posts from 2011

Little Reminder - January Stamp of the Month

Image
Welcome to our Stamp of the Month Blog Hop!  We will be featuring January's SOTM,  Little Reminder,  a set of 25 stamps.  If you have come here from   HELEN'S BLOG  you are on the right path! The blog hop is a great big circle, so you can start here and work your way all around.    If you get lost along the way, you’ll find the complete list of participating consultants  here . This month we have over   50 Close To My Heart Consultants  sharing their creations using this month's SOTM and other great CTMH products on their blogs. Following the blog hop is simple to do - just click on the link at the end of the post on each blog to move to the next one! Here we go! What a great little set!  I love the numbers!   This month I created a layout for my Daughter's 17th birthday.  She LOVES Zebra print so I used the paper from Roxie Level 2 paper pack (X7140B) for this layout.   Each year, the new Tw...

It's Hip to be Square!

Image
If you haven't heard, January is National Stamping Month .   Close To My Heart has a great little deal going on all through the month of January.   When you purchase $25 in Close To My Heart products, you can add the Rock The Block special for only $15.   This is a fantastic deal!   You get a My Creations Cubes along with an E-Size Rock the Block stampset. I wanted to create some cards with the stamp set.  I used the colors from the ColourQ challenge for this card.   The colors were Black, White and a color of your choice.  I chose Olive for my Black and White card. For a sharp black color, I used Black Staz On ink (Z888).  It stamps so pretty!   I stamped the flowers with Olive ink and then cut them out.  The centers of the flowers are Black Button Brads from the Mini-Medley Black Collection (Z1393).   The ribbon is actually retired but still available on the While Supplies last section of my website for only $4....

May This Be Your GRANDEST Year Yet!

Image
Christmas is past and the New Year is fast approaching.  I had so much fun the last couple of months creating Christmas cards! But it's time to put away all my Christmas stamps and start some new projects!  I've been planning a technique card workshop in January and needed one more card.   Mojo Monday provided the perfect sketch to use!   My workshop - Cards With EDGE will be focusing on embossing!  This card is one of four cards we'll create. Here is the Mojo Monday sketch: (I used the square sketch for my 6x6 card) For this card I used the Hooray Bouquet (D1491)   stampset which coordinates with our Art Philosophy Cricut Cartridge (Z1686) .   I cut the large flower <Flower6> at 2 3/4" and a smaller flower at 2".  The large flower was cut onto the Sorbet B&T from Elemental Level 2 (X7141B)  and the smaller 2" flower was cut on Colonial White Cardstock.  Even though the large flower was a print, I st...

Merry Christmas to ALL!

Image
I've been missing in action since Sunday's blog post about our special Rock Around The Block.  This week has been crazy busy.   I worked Monday & Tuesday and then drove up to Kentucky to get Jeff's mom so she could spend Christmas with us.  We came back Wednesday.  Thursday was a cold rainy day and instead of spending time in my craft room - something I LOVE to do on rainy days - I spent the day in the kitchen baking lots of goodies for Christmas.   Thursday, I took Jeff's mom to see his office, Kirsti's apartment and then met Kayli out at The Avenue for Lunch with the girls and Nana.  It was a good day but I think I wore Nana out! Today is quiet.  Both girls are working all day and Jeff went hunting this morning.  I was bound and determined to make one more Christmas card. This is my Christmas card to ALL!  Thank you to those who follow my blog, to those who just like to look occasionally and also to all my fabulous friends...

Rock the Block - December 18

Image
January is National Papercrafting Month!  Close To My Heart is once again introducing a fun new project to celebrate!  Starting today, December 19 through January 31st, you can order this special Rock the Block set! This set includes the My Creation Collage Cubes (a pre-view to one of the New Products in our 2012 Spring Summer Idea Book!) and an EXCLUSIVE fun E-size stamp set! There are so many great things you can do with these cute little 2x2 collage cubes!  To help give YOU some ideas, several Close To My Heart consultants are participating in a Rock The Block Blog Hop!  If you came here from Mary's blog , then you are on the right trace!  When you are finished seeing what I created, hop over to the next blog and get inspired! I decided to create a Family picture collage!  I used the Dreamin' stickease to accent my cubes along with the stamps.   Stickease is a great way to decorate your cubes because they look dimensional (like my buttons) b...

Quick & Easy Treat - North Pole Mix

Image
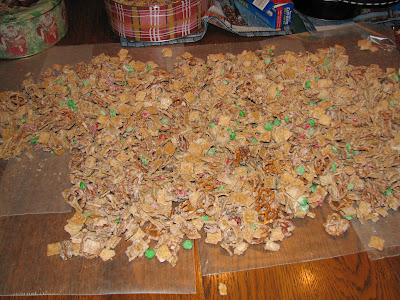
Here is a quick and easy treat that is a MUST HAVE in my family at Christmas each year.   I make a huge batch and put in little Christmas bags and tins to share with family and friends!  I thought it would be fun to share with you! NORTH POLE MIX 1 Box Golden Graham Cereal 1 Box Cinnamon Toast Crunch Cereal 1 bag of Pretzel Twists 10 oz. Pecan Halves 2 bags of Christmas M&Ms 1 1/2 pounds of White Chocolate Bark This recipe is enough to use up the entire boxes of cereal and pretzels.  I mixed this up in 3 separate batches using 6 squares of the White Chocolate Bark at a time. Using a BIG bowl, pour in a little bit of each of the above until the bowl is full. Melt 6 squares of the the White Chocolate Bark in a glass bowl in the Microwave at 30 second intervals stirring after each interval.  Chocolate usually melts in about 1 min 15 seconds.  Pour melted White Chocolate over the cereal mix a little at a time and stir after each addition to ...

My Final Card - Sonoma Card Box

Image
Here is my final card that I created for my Sonoma Card Box project.  I create 8 cards to go into this Card Box that I created a while back.  You can see it HERE . I was inspired by this sketch which I found over at the Try Stampin' On Tuesday blog.   I varied it just a little but the basic idea is here.   My lacy scallop is actually one of zip strips from the Sonoma Level 2 paper .  I used my corner rounder (with the guard removed) to make the straight edge into a scallop to match.  My stamped frame is from the stamp Sweet Moments (C1467).  I used Smoky Plum ink to color the butterfly (from the Just Blooms Flutter Paper Shapes Z1463).  I added pewter brads.  My Birthday sentiment is from Card Chatter - Birthday (D1475).   I just love this set! My cards are now all complete and I have wrapped them up and they are being sent on their way!  I hope my Grandma enjoys her box of handmade cards! All Products used are fr...

Clean and Simple Birthday with Sonoma

Image
I finally sat down and finished my final 2 cards for my Sonoma Card Box.  Remember that little project?  I know, I started it several months ago and have been making cards here and there to add to the box.  This is a Christmas Gift for my Grandma.  I hope she likes it! I used the sketch from Clean and Simple Stamping for this card.  It is really simple but elegant I thought. I used the Sweet Moments (C1467) stamp for the roses and also the lace border across the top.  I stamped the roses with Smokey Plum. After trimming my roses, I distressed the edges with cocoa re-inker and a brush.  I used this same technique along the edges of the card.  The lace and sentiment are stamped in cocoa ink.  The birthday sentiment is from our Card Chatter - Birthday set (D1475).   My final touches are the Opaque Adhesive Gems - Mocha collection.  I added bitty gems to the lace.  Then I added a velvet bow from the Cocoa Designe...

Recipe for a Cookie Swap!

Image
I just returned home from my annual Cookie Swap.   I have some of the best friends in the world and for the 9th year in a row we got together for our annual Cookie Swap.  We started out as a group of friends that loved to scrapbook and the amazing thing is - we all worked together.   Even though some of the girls no longer scrapbook and we've kind of scattered to other departments or jobs, we have remained friends through out these past 9 years.  It is a night full of laughs, remembering good times, and of course LOTS of great cookies!   Since I have Close To My Heart's new Art Philosophy cricut cartridge , of course I had to make my recipe into a Christmas tag!    For my Recipe Card I cut a 6" tag using Shift Tag <Tree 1>.  This tag has a little cut out tree on it. To get the recipe onto the tag, I typed the recipe into a text box in Word.  I then printed out a copy on a sheet of paper.  Next, using removeable adhesive, I...

Misty Snowman

Image
Well I didn't get much scrap therapy in yesterday.  It was late when I finally did get in there.  I started out attempting to do the challenge from Friday Mash-up which was to Create a project with a snowman and/or use their colors combo  - which would have been Blush, Twilight and Grey Wool in the Close To My Heart color world.   I had a snowman in mind I wanted to use but when I went to get it I couldn't find it.   I finally decided it must have gone to my sale box!  But I did find another one to use.   I decided I would use the sketch from Freshly Made Sketches .   I had so much trouble coming up with something I liked using the colors from Friday Mashup.  It was late and my brain just couldn't get past the traditional colors for Winter and Christmas.  I finally threw aside my Blush cardstock and stuck with Grey Wool and Twilight. I used Close To My Heart's Wonderland (X7146B) paper for my background.   I also used my spra...

Memory Game - Make it an Advent Box!

Image
I just realized I never blogged about my Advent Box!  This turned out so cute I wanted to share!  I had a workshop back in October on this cute little box made using Close To My Heart's Memory Game.   The Memory Game (Z1614) comes with 24 3x3 chipboard squares all in a little box that has a magnetic flap for closure.  You can put photos on one side and cover the other side with a pretty pattern paper.  Since there were 24 squares I thought this would be a great opporutnity to make an Advent box with an activity every day. This was so easy to assemble.  I used the Believe Level 2 Paper (X7145B) to cover the box and for each square.  To decorate my squares I used the Believe Stickease (X7145C) and also the Countdown (B1390) stamp for the numbering of the days.  The stickease is perfect because it adds dimension to your squares but not a lot of depth.  You want your cards to lay flat ... and also fit in the box! ...

Christmas Gift Bag

Image
I'm back!  This time I've got a little Christmas gift bag to share!  I made this bag from my Kraft cardstock using Close To My Heart's exclusive Art Philosophy Cricut Cartridge .   The bag was cut using the 6" measurement.  Once the bag is folded and glued together, it is actually 3" wide x 2" deep and 5" high from top of handles to the bottom. I used CTMH's Believe  (X7145B) paper to wrap around the bag and used the zip strip from that same paper for a border.  Isn't that cool?  I cut two ornament tags, again using the Art Philosophy Cartridge.  The Sweet Leaf tag was cut at 2" and the Holiday Red tag was cut at 1 3/4".   I stamped the Holiday Red tag with my Versa Mark Ink and heat embossed White Embossing powder on the image.  The stamp is from December 25th (C1469).  This set is a great set for making quick tags.  I posted a video a few days ago about this.  If you missed it, you can see it HERE . To 'wrap' is...

AWESEOME GIVEAWAY!

Check out this amazing give-away over at "Creating from the Heart" Keepsakes by Melissa . Be sure to become a follower of her blog and sign up for this amazing give-away! I'll be back later with another creation from my corner of StampinHeaven!  :)  The last few days I've taken a wee break - looking for some Christmas Mojo!

A "Grinchy" Christmas Card

Image
There are so many Christmas movies that I love to watch year after year but I think there is only one that brings back Christmas memories each time.    Would you believe that would be the Grinch Who Stole Christmas ?!     You must wonder why THAT movie?  Well, when my husband and I were getting ready for our first Christmas together (over 25 years ago) we got our very first tree.   I remember making felt ornaments (stitched them together by hand!) because we didn't have ornaments for our tree - we actually didn't have ANY decorations.  The night we were ready to set up the tree and decorate, we turned the TV on and the old animated version of The Grinch came on.  Every year after that, when we set up our tree and began to decorate, like clockwork - The Grinch was on TV!  So - it is tradition.  Now we watch the movie - The Grinch.  It has become an all time favorite in our house! So if it's not running on TV when we decorate - we'll ...

Quick and Easy Holiday Tags

Image
If you are looking a quick and easy way to make Holiday Gift Tags, watch this short video by Close To My Heart.  These tags are made using our Art Philosophy Cricut Cartridge and this stamp - December 25th (C1469) .   (See the red lines around some of the images? These images can be found on the Art Philosophy Cartridge!)   All some bling with our Clear Sparkles (Z1104) and you're ready to tie them on your packages!

Color Throwdown for Christmas Cheer

Image
            Looking for the December Stamp of the Month?  You can get right to it  HERE . It's been a long time since I've colored with markers.   Lately when I've been coloring my images I've used the blending pen with ink, or watercolor pencils.   When I saw the colors in the Color Throwdown Challenge this time I just knew I had to use my Close To My Heart Markers.  So I stamped some images and set to coloring!   Aren't these great colors?   Would you think of Christmas for these colors?  I did!  I used Close to My Heart colors Outdoor Denim, Olive, Cranberry and Honey.   I had fun with this 6x6 card.   The stamp set is Christmas Cheer (D1491) which is perfect for coloring.  I added some Red Glitz Glitter Gel for a little accent under the Merry Christmas.   I also scissor distressed the edges of each cardstock piece to bring out the white core.  I used "One the...