Posts

Showing posts from 2010

It's a NEW YEAR! - Find Your Style!

Image
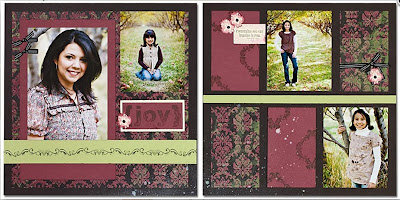
FIND YOUR STYLE in a new year!   It's January 1 so that means it is time for a blog hop again! I've made two more cards with the January Stamp of the Month - Find Your Style .  I can't get enough of this stamp set! Again, I used the Wings paper with this stamp.   One of the B & T papers in Wings had a beautiful background that I wanted to incorporate with the stamp without covering the whole card.  The Sweet Leaf background of the paper had an accent of Juniper so I brought that color to the forefront of the card with the Juniper stamped bird with sponged edges of cocoa.  The card is a simple card of Love. The next card is one of those ideas that come to you at random moments.   This card design idea hit me at a time that I was not even in my scrapbook room.  I was in the shower where most of my ideas seem to hit.   I don't know.... maybe it is the hot water heating up my brain.  ha ha.  I couldn't wait to sit down and put this one on paper. The shoe was th

Find Your Style

Image
I fell in love with this January Stamp of the Month the minute I saw it. My first thought was "I don't know what I'll do with it but I LOVE it!" I had a little bit of quiet time on Christmas to play with this stampset so I sat down to make a few cards and the ideas started flowing! I love the vintage look of the stamp and it works perfectly with the new Wings paper. Here are a two of the cards that I made. RECIPE: Wings Level 2 Paper (X7135B) Find Your Style Stamp (Only Available in January!) Black Ink (Z2105) Wings Level 2 Assortment - Pleated Black Ribbon (Z1398) Buttoned Together Stamp (C1361) Barn Red Cardstock (X5637) RECIPE: Wings Level 2 Paper (X7135B) Find Your Style Stamp (Only Available in January!) Barn Red Cardstock (X5637) Black Ink (Z2105) Barn Red Ink (Z2104) Juniper Ink (2165) Opaques Adhesive Gems - Mocha (Z1333) Note: The smaller butterflies were cut from the Wings B&T paper! I have two more Find Your Style cards to share so be sure to come back

Be Inspired With Wings!

Image
The new 2011 Spring Summer Idea Book from Close To My Heart doesn't arrive until February but January has a sneak peak of things to come.   Let me say.... if the sneak peak is this beautiful, I can't wait to see it ALL! In January my clubs and my Thursday night workshop will be creating a beautiful layout and cards with the Wings kit.    The workshop kits have not changed.  They still include a full Level 2 paper pack, an Exclusive stamp (that is NOT available in the Idea Book), a coordinating embellishment AND a full color, step-by-step instruction brochure for both layout and cards!   PLUS, when you purchase the Wings kit in January you get a spray pen AND instructions for making a banner!  You get all this for just $29.95   How cool it that?  (You can see the banner I made on my previous post -  Wings Banner ) I was able to get my Wings kit early for pre-view and put it together.  The papers are awesome and I LOVED the spray pen.  This is a cool technique I'll be tea

A Little Bit of Mistletoe!

Image
 It's been a quiet day for Christmas Eve.   My oldest daughter had to work until 4:30 and my youngest went to pitch with Dad.   So I had a little bit of quiet time to myself this afternoon.   Everything was wrapped and I've done all the baking I was going to do today.  So I sat down to do a little project I've been wanting to do all December!   This only took my 45 minutes!  No Kidding!   I've decided that everyone should always keep a 6x6 Memory Showcase album and a Level 1 Paper kit on hand.   These two items make a fast, simple and easy gift! I used Mistletoe Level 1 along with Snow Days stamp set to make this quick little gift.   Take two of the base pages and cut into 6x6 squares.  Then use your included cardstock and stickease to dress up the pages!   RECIPE: 6x6 Memory Showcase Album (Z1195) Mistletoe Level 1 (X7130A) Snow Days Stamp (C1420) Cocoa Ink Pad (Z2114) Red Grosgrain Ribbon (Z1103) Red Brads I HOPE EVERYONE HAS A VERY MERRY CHRISTMAS!

All Decked Out

Image
If you have been wondering where I've been since the cookie swap..... well I've been a little bit under the weather.   I know.... it's NOT the best time of year to come down with a cold but it really took me out of my craft room for several days!  I am just now beginning to feel a little better but I still haven't made it back into my craft room.  I've got so many things I want to do this week! This week's Heart 2 Heart Challenge was to post a favorite Christmas card.   Since I was not feeling up to crafting, I did sit down with ALL my Christmas cards that I had made in the past.  I thought I would address a few and send out a few to my new friends I have met this past year.  It was fun to remember the excitement of using each new stamp and thinking of ways to create with them.    I wanted to post one of my past favorites.... All Decked Out.    It reminded me of playing with paper dolls - except this was a snowman!  It comes with a choice of hats, scarves and

Cookie Swap!

Image
If I have counted correctly, this will be the 8th year for our annual cookie swap.   It began with a group of girls that worked together in the same department and had a common bond of scrapbooking.   Over the years, some things have changed. Some of us still work together, while others have moved to other departments or even another company. Some still scrapbook and some have found other hobbies they enjoy.  But one thing has remained steadfast - and that is the bond of friendship among 12 ladies.   We all lead very busy lives, but  we make a point to get together this one time of the year to sit together, catch up, laugh and of course eat cookies! This year I made Red Velvet Christmas Cookies.  I had a very busy week and weekend so I wanted to keep my recipe simple.  When I came across this one, I knew it was the one I'd make this year.  So far, these cookies have passed the family taste test.  They all gave this recipe a thumbs up.  My family can be very tough cookie criti

Wings Banner

Image
January is National Papercrafting month and Close To My Heart is inspiring us to celebrate!   This week I received my pre-view Workshop kit and stamps that I ordered.    The workshop kit is Wings and it is GORGEOUS!    I will be sharing my layout from that kit soon but first I wanted to share my banner that I made.    In celebration of National Papercrafting Month, CTMH has included an instruction sheet in the Wings WOTG kit for making a banner with their new My Creations Banner.  I made the layout and cards for the kit first and STILL had plenty of paper to make the banner.   This banner is chipboard and include 8 flags and rings.    Since I recieved my kit and banner before the Holiday Bazaar, I decided to make my banner to hang in my booth.  Perfect! Here is another picture a litle bit closer showing the middle three flags. I used the new Bohemian Alphabet stampset for Close To My Heart.   I stamped each letter and cut them out, then used foam strips to make them stand out.    No

Bizarre Stuff!

Image
BAZAAR that is!  But some might think these little albums made from Close To My Heart's My Acrylix stamp envelope bizarre!  I think they are cute!  First I want to give credit to one of my spa buddies - Shannon Pelletier for this wonderful idea!   She made a bunch of these and brought them to us in Utah at our Retreat.   They were so adorable I couldn't wait to get home and make a few myself. This turned out to be a perfect way for me to use my retired 6x6 paper samples and leftover stickease from other projects that I had.  These two albums are made with Top Stitch (top left) and Tinkerin' (right). You can use old stamp envelopes or you can purchase these in packs of three from Close To My Heart.  (Item # Z335 - 6x6 Paper Organizers) To make the album - first slice open the sides of the envelope so that it opens like a book.   Cover the front and back with B&T paper.   I found some CD size envelopes to adhere to the inside back cover for a photo CD.  Then I added 6

ADK Holiday Craft Bazaar

Image
I have not participated in a craft show or bazaar for nearly two years and when my daughter came home from her ADK Sorority meeting back in October, she handed me a piece of paper and said "Here is something you can do!".   My first response was "There is no way! I'd never be ready in time".   Then I gave it some thought and decided I would do it.  I love the opportunity to meet new people and share my love for Close To My Heart!   So.... I'm going to be at the Doubletree Hotel in Murfreesboro, TN on Saturday, December 11th   If you are out shopping - stop by and see me!     I'm going to have some inexpensive gifts that would be great for co-workers and friends or just a little something to stick in someone's stocking.   Here are just a few items.  (I'll show more later this week) One of my very favorite stamps this season is the A-size stamp  - "A Sip".   I loved making these little hot cocoa packet covers with this stamp.   Each fla

Heart 2 Heart Challenge - Sketch Week

Image
I recently discovered a great new blog.   It's been around for a while but I never took the time to go see what all the H2H Challenge talk was all about.  I'm so glad I found it!  There is some GREAT artwork on this blog.     This week's challenge is a sketch.      Last weeks Design team member Mandy Leahy had a video demonstrating making paper flowers.  I could not wait to try it out.   It was a little late for me to get in on that challenge so I decided I would give this week's challenge a try and I just had to include one of those flowers! I used December's Stamp of the Month - Amore and Magnifique paper. So, without further ado.... here is my card for this weeks H2H Challenge: Recipe: H2H Challenge Sketch December Stamp of the Month - Amore Magnifique Level 2 Paper kit (X7127B) Chocolate Cardstock (X5643) White Daisy Cardstock (1385) Pacficia Ink (Z2192) Lagoon Ink (Z2195) Opaques Mocha Adhesive Gems (Z1333) White Daisy Grosgrain Ribbon (Z270) Sponge Dauber

Ah.... Amore! in December

Image
December's Stamp of the Month is all about AMORE!  I know it is too early to be thinking about Valentine's Day already but if you plan to make some cards for February 14 you need to get your stamp this month! I had so much fun playing with this stampset.  I stepped away from the pink and red traditional valentine colors and reached for one of my favorite paper packs of this season - Magnifique and the colors of Pacifica, Chocolate and Lagoon. I'm so excited to share my cards with you!  I made 3 different cards but I will share 2 today and a 3rd on Friday. So you'll have to come back and see my FAVORITE card of the three. This is a 8 x 3 1/2 card pattern from Originals .   The pattern is called Vertical Three  but I changed it up a bit and made it a "Horizontal Three".   My card is accented with the Opaque Pearls Adhesive Gems (LOVE these gems!)   I stamped the heart two times with Pacifica ink using 2nd generation stamping and punched out a circle from

Do you Believe?

Image
I made a few more Christmas cards yesterday morning before going over to my mom's for more food and games.    I thought I would share a couple with you.  These were very easy and very quick!  Just the way I like it!  (Although I list the Item # for the cardstock, these cardstock colors are included in the Mistletoe Level 2 paper pack)   For my card bases I used Close To My Heart's Colonial White Cards and Envelopes Value Pack (X1410).   You get 50 cards (4 1/4 x 5 1/2) and envelopes for only $14.95.  This comes to about 30 cents per cards which is very economical!  (And saves your paper cutter blade from cutting all that cardstock for cards!) On this card I wanted to make my reindeer fly so I used 1st, 2nd, and 3rd generation stamping.  I stamped Santa twice.  To get a good deep color on Santa and to cover up the white edges where I trimmed him, I used a sponge dauber and inked over the entire surface and edges of the Santa.  I cut out the snowflakes on the 2nd Santa and adhe

Happy Thanksgiving!

Image
I love this time of year! Thanksgiving holds so many special memories for me.  For many years, my family would gather together at my grandma's farm in Newburgh, IN.   Now we stay close to home and we go over to my moms - each bringing our specialty dish!   So much food!  I hope everything is having a wonder Thanksgiving holiday and spending it with family and friends!   Recently as I was prepping for my upcoming Olivia Workshop, I decided to use the same card instructions in the kit but change the stamp to make some Thanksgiving cards.       The pumpkins and the "May the bounty......" quote both come from the new stampset - Harvest Home .   These stamps are great for coloring and shading (although I did not use that technique here).    On the first card to the left I used Barn Red ink and stamped onto Barn Red cardstock.  Then I sanded the area of pumpkins bringing out a little of the white core.   The other quote on the card to the right is from The Present .  It has a

Customer Spotlight - Terry Reid

Image
Just in time for Thanksgiving!  My good friend and StampinHeaven Hostess Club member created this beautiful Thanksgiving card.   She used the Centers Accent pattern the Jeanette's How To book - Originals .   I love these how to books for cards.   If I find a card I really like but don't want to make the size shown in the book, they are so easy to adapt to other sizes, which is what Terry did here. For this card, Terry used Cocoa, Goldrush, Olive and Colonial White Cardstock.  The card shown in the Originals book used a pattern B&T for the piece at the bottom.  Terry created her own B&T by using random stamping with Goldrush ink on the Goldrush piece of cardstock.    She used dry embossing on the cocoa piece at the top.   Terry exposed her embossing by sanding the cardstock to bring out the white core. The buttons adorning the card were from Close To My Heart's Autumn Button collection (now retired).  They are adorable on this card! Gee.... wish I had thought to

I'm no Cake Boss!

Image
Last night as Jeff & I were getting into bed, he asked me "Did we leave a light on outside? It seems really bright."   I said "no - must be full moon.   Just like it was 16 years ago."   November 19, 1994 was a memorable night.   It was the first weekend of gun season for deer and my husband wanted to go hunting.   I was one week overdue with my second child and Jeff wasn't sure he should go.    I insisted he go.  I told him that if he stayed around nothing would happen.   I was getting frustrated that this baby was taking so long to decide to come.   Jeff agreed to go only if I went to stay at my mom's house.   I'll never forget as we stopped to pull out onto the highway, looking up and noticing how big and full the moon was.   Jeff looked at me and said "Are you sure?"   I told him "I sure!"   So I went to my mom's and he headed for the woods.    As the morning was about to dawn, Kayli decided it was time.   Jeff had just cl

Creating with My Creations - Acrylic Mini Album

Image
This is one of the most fun items of the My Creations products that I have ever done!   And, sad to say, it is retiring after December 31.   I went ahead and purchased a couple of extras because I know I will want to do a few more of these before they are gone.    This little mini album pictured here was one I created for my daughter's birthday. The challenge in creating an Acyrlic Mini Album is hiding your adhesive and layering your pages.   Your top page will reveal a little bit of the the page underneath.   Close To My Heart's Rub-Ons work beautifully on these pages also.  For this album I used Boom-Di-Ada paper (now retired) and Nature's Ambiance Rub On's and the stamp set Friendship Word Puzzle.  This stamp is one of my "Go-To" stamps when I do anything about friendship.  I will never tire of this one!  Check out my slide show below that shows each page of the album. Do not let this one pass you by!   This album was originally $14.95 but has been mar

Creating with My Creatons - Display Album

Image
One of my FAVORITE My Creations products is the Display Album. This incredibly versatile album has a hard front and back cover that is easy to cover and embellish.  It opens up in a triangle fold for displaying on a desk or end table.  You can get creative and use it as a desktop monthly calendar, photo flip frame or even a recipe book of heirloom recipes.  This album is just $7.95 and would make a great gift!  See some great examples of Display albums below. I created this album highlighting some of my favorite recipes from an annual Cookie Swap I attend each year.  I used paper from the Mistletoe Creative Basics paper (X5811) along with the new Old World Alphabet Stampset (E1017).  I embellished the cover with Cranberry Designer Ribbon (Z1209) and Mistletoe Level 2 Assortments (Z1330). There are 12 spiral bound 6x6 page protectors that are perfect for protecting your recipes!  Print out your recipes on cardstock and embellish with fun stamps! Here is a fun idea!  For a Cookie

Creating with My Creations - Memory Showcase Albums

Image
Here is a quick and easy memory album that makes a wonderful gift!  These Memory Showcase Albums come in two sizes: 9x9 ($5.95) and 6x6 ($3.95).   The front and back of the albums are like hardbacked books.  You open the front cover to reveal two 2-page layouts.  When the book is closed you can open the back cover  and it will reveal another 2 page layout!  This is a total of 8 pages.    I have done several of these as gifts. Here is a Christmas themed book I created when the Memory Showcase Albums first came. The paper I used on this book was from the Creative Basic Evensong collection which is now unavailable.  But this year's Creative Basic Mistletoe (X5811) would be perfect!   This pack comes with 12 sheets of B&T (6 each of 2 designs) and a coordinating round of ribbon at a low price of $7.95.   Just add cardstock and embellishments and you've got a really nice gift!  See all the pages in this slideshow: I also made a 9x9 Memory Showcase album for my Dad for Fath

Creating with My Creations - Cube

Image
Close To My Heart has some great 3-D products called My Creations that you can alter to make some very special gifts.   They are easy to alter  - just cover with paper and embellish!   We have a wide selection of My Creations 3-D products - the Showcase Memory Albums (9x9 and 6x6), Display Album, Recipe Box,  Mix & Mingle, Board Book, Journal, Acyrlix Album, All-Sorts Mini Album and more!   Over the next several days I will be sharing some of the 3-D My Creations projects that I have done. Just recently I finished a My Creations Cube.  I have to admit, I have had this cube for a while.  I just wasn't sure what I wanted to do with it because there are so many possibilities.   Our Idea Book has some great artwork pictured through out the book using the cube.   I chose to make my cube a Christmas gift box!  This cube is 5x5x5.  It is the perfect size to hold a Christmas coffee mug and some hot chocolate! The cube comes flat which makes it so easy to cover.   I cut each sqaure o

"A Little Thanks" goes a long way!

Image
It is always handy to have a few Thank You cards on hand.   So I made up a few using Close To My Heart's Stamp of the Month - A Little Thanks.   I chose to work with the Cherry-O paper which was introduced in our 2010 Summer Idea Book.   This paper will retire December 31 so if you like it, you need to get it before the end of the year!   (Be sure to check out this month's special on my  Monthly Specials  tab) For this round card I used our 4 1/2" Colonial White Circle Cards (Z1352).   I used the Simple Secure pattern from Wishes .  The pink band with zig-zag stitching is cut from the ribbon paper in Cherry O (so the stitching isn't actual stitching!). The ACTUAL stitching is around the border of the card.  I used Chocolate embroidery floss to stitch around the edge.   It was easy and only took a few minutes.  "Gratitude" is stamped in Chocolate ink. Accents are colonial white and chocolate buttons with a Chocolate Ribbon (it's real). My next card