Posts

Showing posts from November, 2012

Year Round Cheer - December Stamp of the Month

Image
Welcome to our Stamp of the Month Blog Hop!  This month we are featuring Year Round Cheer , a set of 12 stamps.  If you have come here from Lalia's Blog you are on the right path!  The blog hop is a great big circle, so you can start here and work your way around.   If you get lost along the way, you'll find the complete list of participating consultant's HERE                              We have over 50 consultants participating in the hop. Following the hop is easy, just click on the link at the end of the post and it will hop you right over to the next blog! This is the perfect set for quick little cards to add to a gift or for making pages for our Event Calendar!  I used this set to for my Event calendar.   There is a stamp for each month!  Here is a picture of each 'page' I made for my Event Calendar before I attached them all. For many of these, I used keys from the Artiste Cricut cartridge .  (Feb,May, June, July, October and November).

The Magic of Christmas Glitters!

Image
I just love the new Pear & Partridge Glittery Rub-ons!   With these rub-ons you can create pretty cards in a snap.   The glittery snowflakes added a little sparkle to what would have been just plain Cashmere cardstock layered on Cranberry.  The birds stringing the Christmas lights and the little flower are all rub-ons.  Aren't they pretty? I used the Art Philosophy cricut cartridge to cut my shape using the layer key to cut the Pear & Partridge B&T paper to layer.   The sentiment is from Christmas Love (D1492) . I'm entering this card into the Heart 2 Heart Challenge - Glitter It Up! Here is the complete set of Pear & Partridge Compliment Glittery Rub-ons (X7162C) : Get the rub-ons separately or order the Pear & Partridge Workshop on the Go kit which INCLUDES the rub-ons PLUS Purple, Pink & Red Sparkles  (G1052) and an instruction brochure to create a 2 page layout.   Don't wait to get these!  They will not be carried forward in the Spri

Silver Embossed Ornamental Cheer

Image
Happy Thanksgiving! I hope everyone is has a wonderful day of food, family and fun.   I'm looking forward to spending the day with my family.  Before I begin the making of our traditional Thanksgiving dressing, I wanted to post a Christmas card that I created last night!  I combined the colors from Color Throwdown with the sketch from Freshly Made Sketches .  Then I added some silver embossing for the Paper Players !  So here is my card for these three challenges combined! Sometimes I have a hard time with non-traditional Christmas colors but I was immediately inspired by Color Throwdown's colors.   I used Close To My Heart colors of Pacifica, Olive and Sky with Silver Embossing as my 'grey'.   My ornament was cut with the Art Philosophy Cricut <Ornament 2>. Then I stamped it with the coordinating stamp from the set Ornamental Cheer (D1520) .  I love this set and have so many things I want to try with it.  I just need a little more time!  The

Merry Christmas for Merry Monday!

Image
I am so glad I found the Merry Monday challenge!  I just love their sketches.  I couldn't wait to give this week's challenge a go.  Here is this week's sketch:                                          Here is my card: I used Pear & Partridge paper   (X7162B) for this card.  I couldn't decide on a base color for the card but finally decided to go with the Cranberry.  I love the reds and pinks in the paper.  I still have several Pear & Partridge Glitter Rub-ons (X7162C)  that I have been wanting to use so I used the little bird and ornament for this card.  I cut the decorative circle out with the Artiste Cricut Cartridge - Accent 4<5> key at 2".  The cranberry mat was cut at 2 1/4".   I stamped "Merry Christmas" and snowflakes with Cashmere ink onto the Cashmere cardstock.  Then I added some Bitty Opaque Adhesive Gems (Z1707)  to the snowflakes.   The stamp and snowflakes are from Ornamental Cheer (D1520).   (I can't wait

Mystery Hostess Announced and an Artiste Gift Card Holder

Image
Thank you to all who joined my Mystery Hostess Party and shopped from the comfort of their own home!  I'm excited to announce THREE lucky Mystery Hostess!!  They will each get $20 in FREE Close To My Heart Products! ****WINNERS**** Rachel Boudrow Mandy LaCroix Vicky Roeger Be watching for another chance to join a Mystery Hostess Party!  Don't want to wait?  Be your own Hostess today!   Call me and book yours today. Now, I want to share with a cute way to make a gift card holder!  I used the Artiste Cricut Cartridge to make this holder.  It was very simple!  The Cricut cuts the card and it folds so that you can slip a gift card inside! I set the cricut to cut at 5".  I recycled an old gift card so my card is a little thick. This size worked well.   If inserting a regular card you can use 4 3/4" measurement.  "Merry Christmas" is also cut using the Artiste Cricut Cartridge.  I set the measurement to 2".               To re

Give Thanks

Image
I didn't think I'd be creating any more Fall/Thanksgiving cards because I've been in the Christmas mode lately.  But I couldn't pass up on a few challenges that I wanted to try out.   Moxie Fab was one.  It called for using canvas, cork and or burlap.   The key word here is Burlap .  If you've been following my blog, you know how much I love playing with burlap! So I combined the sketch from Freshly Made Sketches , the colors from Just Us Girls and the call for cork and burlap for Moxie Fab!  Here is what I came up with!  A simple card to Give Thanks. I used Kraft paper for my card base along with a piece of B&T paper from the Flirty Paper Pack (X7160B) .  The leaves are from the Flirty Compliments Dimensional Elements (X7160C) .   I tied some Olive Bakers Twine from the Baker's Twine Harvest Assortment (Z1751) around my piece of Burlap.  I cut the Burlap lengthwise to make is more narrow and pulled some strands to fray the edges.  I used the Colo

She's 18! - A Birthday Card

Image
There is a very big birthday coming up on Monday.   My baby is turning 18!  It seems just yesterday that I was bringing that little bundle of joy home.   Now she's planning for college, and enjoying every last minute of her senior year in high school.  My how time flies. This week's  Color Throwdown  challenges includes her most favorite colors! So I knew I had to use them to make her a birthday card.  I combined the color challenge with the sketch from  Clean and Simple Stamping . I used the Close to My Heart colors of Cocoa, Chocolate and Crystal Blue cardstock.  The printed piece is from a retired Magnifique paper pack.  That was one of my favorite packs!  I used the  Artiste Cricut  cartridge to cut the Happy Birthday sentiment along with the "18" and banner that I adhered to a dimensional element.  The  Silver Shimmer Trim (Z1799)  is adhesive back and adds the right amount of sparkle!  I added a glitter accent to the banner which perfectly matches the ri

Happy Holidays with Silver Embossing

Image
Today's quick card features Silver Embossing!  I made this card in quick time using Merry Monday's sketch and colors from Dynamic Duo .   When I saw the colors for Dynamic Duo after checking out the Merry Monday sketch, I knew this was a match in Winter Wonderland.                                         I used Close To My Heart colors of Whisper and Cranberry cardstock for my card.  The sentiment and snowflakes are from Perfect Fit - Holidays (B1412) .  They were stamped with VersaMark ink and embossed with Silver Embossing Powder.  The ribbon is Slate Satin Polka Dot Ribbon (Z1802) .   My flourish is the last little bit of   Sparkles Flourishes (Z1708) that I still had left.  (NOTE TO SELF - Order more Sparkle Flourishes!)  Then I added sparkles from the Sparkles Clear Assortment (Z1752) to the ribbon. The Perfect Fit - Holidays stamps is a great little set.   I'll be using this one a few more times in the upcoming weeks.  I have so many ideas going on in my

Avonlea Featured at Annual Banquet of Tables

Image
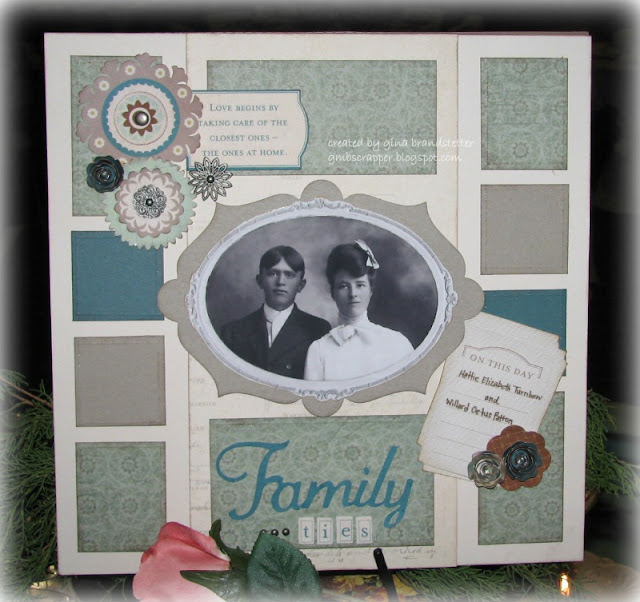
Each November, the ladies at my Mother's church host a Banquet of Tables.  Several ladies in the church will sign up to host a table and they will decorate the table in the theme of their choice.  My mom has decorated a table for as long as I can remember and they have always been beautiful!  Walking around looking at the tables is like looking at different scrapbook layouts!  They are all unique, tell a story and have a style of their own. This year my mom was drawing a blank on what to do.  You know we all hit that creative wall at some point and I guess my mom was standing at that wall waiting for an idea to come to her.  I suggested she do something about a Godly Heritage.  I had recently created a one page layout using the Avonlea paper featuring an old photograph of my great parents. It was featured on Jeanette Lynton's blog a few months ago. You can see it HERE. Together, my mom and I tossed back and forth a few ideas and things just started coming together. We dec

Christmas Card for Merry Monday

Image
Here is this week's card for Merry Monday !  I love this Monday challenge. Here is the Merry Monday sketch:                                                   This was a pretty simple and really quick card.  I used the Pear & Partridge paper and the Art Philosophy cricut cartridge to cut my shape.    The candy canes are from the Pear & Partridge Rub-on Compliments.  I added Pearl Opaque Adhesive Gems as my final touch. RECIPE: 4 1/4 X 5 1/2 Card Pear & Partridge Paper Pack - (X7162B) Pear & Partridge Rub-on Compliments (X7162C) Sentiment:  Glory to God Stamp (D1483) Pearl Opaque Adhesive Gems (Z1336) Art Philosophy cricut cartridge (Z1686) <Shape 8> Pear & Partridge Paper Pack                                        Pear & Partridge Rub-on Compliments DON'T FORGET !!!   MY MYSTERY HOSTESS PARTY IS STILL GOING ON!! No need to dress up, fix up or even get out of your your house!  You can shop in the comfort of your own hom

Clean and Simple - Birthday Card

Image
I have a lot of birthdays coming up this month, so I needed to step away from the Christmas theme I've got going.   For this birthday card, I used the sketch from the Clean and Simple challenge.     I used Kraft cardstock for my card base.  The paper is from the Clementine Paper pack.   This card was really quick because I used the Clementine Canvas Compliments for my 'spray' of flowers.  The "Happy Birthday" was stamped with Twilight ink onto Cashmere Cardstock.  I cut the banner with the Artiste Cricut Cartridge and applied it to a Dimensional Element of the same size.  The stamp and the dimensional element are both part of the Artiste Cricut Collection.  The Artiste Collection includes 3 stamp sets and 3 different sets of dimensional elements that coordinate with the stamps. (SO COOL!) RECIPE: Kraft Cardstock (Z1375) Clementine Paper Pack (X7156B) Clementine Canvas Compliment Shapes (X7156C) Brown & Tan Sparkle Assorment (Z1753) Arti

Christmas Wishes Display Tray

Image
This Christmas display tray has been on my "To Do" list for about a month now.  I've just had so many other things that needed to be done first.  I thought this would be something that would take me a while to create but actually, I put it all together in just two hours.  I have to admit, I was watching The Time Traveler's Wife while I was working on this tray, so I was distracted at times. The "Dimensional Elements - In Color Holiday" (X1772) made this tray so easy to put together.  These are printed, layered chipboard with rhinestone accents.  PLUS, the really great thing - they are adhesive backed!!  The look great with the Pear & Partridge paper that I used for the background. I added a few accents of my own that I had on hand and also the Artiste Cricut Cartridge to create my flowers in the bottom section and the red bow on the top row.  A list of all the products used are at the end of this post.  Here are some close up pictures of each